
Your cart is currently empty!
How to Paint RV Walls and Cabinets
How to paint RV walls is a common question when looking an RV renovation in the eye. And rightfully so. It is far more complicated than people think, and there are many things you need to know to be successful.
It didn’t matter how much research I did or how much I read. There were still some things I had to figure out and learn as I went. My lessons and tips for prepping my RV are found here.
But to jump straight into what I learned while painting RV walls and cabinets, read on! Also, check out the renovation before and after pictures here.
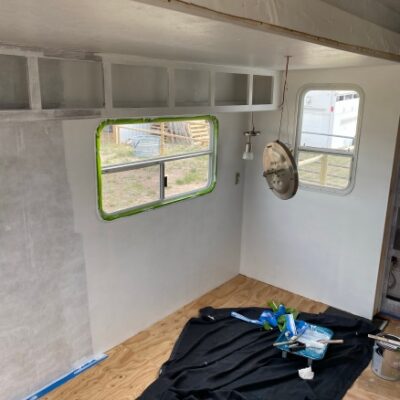
Paint RV Interior
The online advice for painting an RV interior is all over the board. From how much prep to type of paint, it was difficult to wade through. However, I gleaned some themes from the most prominent RV renovation blogs (although even they differed!), and I finally had to make some educated decisions.
Prepping to Paint RV Cabinets and Walls
These are the recommendations to paint RV cabinets and walls:
- Give everything at least a light sanding.
- Wash your cabinets and walls with a degreaser.
- Use a quality primer on everything.
Follow ALL the recommended steps. I did see recommendations to wash first, then sand, but this didn’t make sense because it meant I’d be washing twice. Perhaps if your RV is extra dirty, it might make sense to do it this way. Mine wasn’t, so this worked fine. However, it was actually much grosser than what you could see with the naked eye. I made sure to wash the ceiling too, which was definitely the worst near the stove.
Additionally, there were places I accidentally missed a step, and it mattered. As a result, the paint didn’t go on as well and required more coats. On the inside of the bed platform, I got lazy and, at first, didn’t bother painting it. Then, when I had extra paint (and being even lazier and just tired), I just swiped a few coats on, unwashed, unsanded, unprimed. Needless to say, when I peeled the tape off the floor, the paint peeled off just like #1 in this post by RV Inspiration.
Sand your RV Cabinets
I would recommend using a sheet sander like this one from Black and Decker. It allows you to get in corners, work methodically covering plenty of surface, and will catch some of the dust.
A light rough-up on the walls is sufficient, but a little more on the cabinets, especially the doors and drawers, is best. I gave the doors the most sanding, and I’m glad I did. Also, I did the doors after I removed them. This was nice because ultimately I ran them under the outside faucet and gave them a good bath that way. The only caveat to this is my cabinet doors are solid wood, so there was no risk of warping them. If yours are made of particleboard, don’t do this as you’ll likely ruin them.

Washing RV Cabinets and Walls
There are a lot of cleaners/degreasers out there to choose from. Many of the RV renovation gurus recommend one with TCH, but I also read some primers and paints don’t work well if applied to areas that have been cleaned with it. Plus, it just sounded really toxic, so I chose a gentler, less toxic spray type that worked fine.
I filled two buckets and had a big sponge for each. After spraying my degreaser on the wall, I wiped it down with the sponge in the first bucket. This became my “dirty” bucket. I followed it with a wipe down with the sponge from the “clean” bucket, which eventually became dirty. It worked okay, but I had to refill the buckets with clean water several times. If I had it to do again, I probably would have followed the process with a dry towel just to make sure I got any excess residue.
Also, wear protective eyewear when doing the ceiling as it will drip on your face!
Priming RV Cabinets and Walls
The beauty of doing both the cabinets and walls at once was I could use the primer to go over everything.
I saw several recommendations to use a paint sprayer, and I was going to. But then I started reading that primer will clog quickly. You need an airless sprayer for better results and less hassle, and spraying can create a huge mess. So even though I knew it would take some time, I decided to do it by hand.
I went with Zinsser 123 Primer based on many recommendations, and needed almost an entire gallon for one coat on the walls, ceiling, and cabinets, inside and out.
It took me about 8 hours of straight painting to get everything primed.

Paint RV Cabinets and Walls
RV cabinets come in all qualities. Some are pretty cheap, while others are of higher quality. However, I think the one thing they all have in common is they have a finish on them that paint won’t stick to on its own. Therefore, some prep must be done for a higher chance of success.
Additionally, I saw recommendations for both oil-based and water-based paint. I finally went with water-based for ease of clean-up, and so I could use the same paint on the walls and cabinets. If I had it to do over again, I might have chosen oil-based for the cabinets because it might have gone on better, but with all my prep, water-based was fine. Using the same color on all of them (except for some accent cabinets) also made painting a lot easier.
Type of Paint
I ended up going with Valspar Reserve Interior paint in a Satin finish. Everything I read said to go with either Eggshell or Satin, and I think Satin turned out really nice. I did go with the Reserve because it was a one-coat paint, and figured there would be a chance I could get away with one coat, but I was wrong.
For the walls, I used Swiss Coffee (7002-16) for the white, which I’d used in a house before. I did two coats. It’s very popular and looks great. I ended up needing three gallons of paint, although I did end up with about ½ a gallon leftover.
For the blue, I bought one quart of Salty Dog (HGSW9177) and crossed my fingers it was enough. I only used it on the bottom kitchen cabinet and the cabinet under the TV. I had to do two coats on most of it, but I did three on the doors. Thankfully it was just about the right amount.

On places where I didn’t sand or forgot to prime (or even some areas I did prime), it definitely didn’t always stick properly. Luckily, subsequent coats covered up the spots it didn’t initially stick to.
Final Thoughts
If you ask anyone who has done it, the general consensus is RV renovation is A LOT of work. But it’s worth it. Whether you are going to live in it full or part-time, it changes the entire feel of the space.
Rather than something outdated and probably smelly, you’ll have a fresh, clean place to enjoy your time in. So whether it’s kicking back with a hot cup of coffee and doing some reading or preparing for a long day on the trail, life will be just a little bit more enjoyable. When you open your eyes in the morning and see the beauty you’ve created, all of the blood, sweat, and tears will be a distant memory.
What lessons have you learned while renovating an RV? What other questions do you have that I might be able to answer?
Comments
One response to “How to Paint RV Walls and Cabinets”
I’ve never remodeled my home before, so I really don’t know where to start. Luckily, I found the best paint for my RV cabinet. It’s a paint kit from Nuvo. This paint is highly recommended as it’s a safe, easy, and cheap solution when you just need to add some color to your interior.
Leave a Reply