
Your cart is currently empty!
RV Renovation Lessons and Tips I Couldn’t Find Online
I’m a believer in manifestation. What does that have to do with RVs, you ask? Well, I believe I accidentally manifested an RV renovation!
When I decided I wanted to quit my job, buy an RV, and sell my house, I started researching. I wanted to pay cash since I wanted to go into this new chapter with zero debt. I decided to be open to an RV that needed renovating. Back in January 2021, I actually wrote down “renovate an RV” on my to-do list.
I must have been feeling really motivated at the time.
After looking and looking and doing my research on renovation, I decided maybe I DIDN’T want to renovate. But it was too late, and the wheels had been set in motion.
Buying an RV
After all my research and months spent online, here was what I wanted:
- 25-30 foot long travel trailer.
- Northwood Arctic Fox (due to a really good Arctic Package).
- Solar panels (this was not necessary, but it would be nice to have).
- Since I was buying used, I wanted it to come with the hitch and sway bars.
- Some sort of rack on the back (again, not necessary, but nice to not have to add later).
- $15,000 or less.
- In good shape!
For some reason, I kept having a feeling I’d find one in Missoula, Montana, even though I was looking all over the state and in Idaho.

The morning I learned Northwood also makes Nash, which has the same Arctic Package as the Arctic Fox, I found a 2009 in Missoula. It’s 29’, has solar, has a toolbox on the back, came with the hitch and sway bars, was in my price range, and was in excellent shape. However, if I was going to live in it, it needed to be renovated.
Fortunately, for this particular model, many things didn’t need to be replaced (like light fixtures). Still, the cabinets and walls needed painting, and it needed new flooring. From what I had learned, this was going to be time-consuming. Additionally, it would mostly be me doing it with whatever help I could beg from family members.
Manifestation point made.
Prepping for RV Renovation
The first thing I had to do was get rid of everything I didn’t want. This included the old nasty couch and the crappy mattress. Luckily, there was a bit of an issue at the dealership the morning I went to pick it up, and I got the RV place to remove those things for me!
Removing RV Window Valances and Shades
These were the most obvious things that needed to be removed as RVs aren’t known for their stellar decor. It seems like RV manufacturers insist on staying several years behind the times, and I see this complaint time and again on RV renovation blogs. Needless to say, it was pretty satisfying to begin removing the hideous maroon and gold polka dotted accents in my RV.
I recommend having a really good power drill as you will use it constantly in your renovation.
It is also good to have a Philips attachment that is several inches long to reach into deep spaces. My DeWalt Cordless Drill SAVED ME. The batteries last forever, but I recommend a backup because they need to be recharged eventually.
If you want more detailed directions for this deconstruction, I recommend this post by Mountain Modern Life. I have used their site frequently to assist with my renovation.
Removing RV Wallpaper Decorative Strip
This is that ugly stripe of wallpaper that usually runs horizontally down the middle of your RV walls. It’s never in a desired pattern or color. I wasn’t sure how it would come off, but it turns out it was pretty simple. I saw someone suggest scoring the middle of each piece in a triangle, so you have a place to start from, but I ultimately found it easy to peel from the sides.
A utility knife is helpful to cut along the edges. Then, just peel slowly off. There will be a film leftover, but a good primer will neutralize the stickiness. I read about that on Instagram, and it proved to be true. The only downside is, even after painting, I can still see the line if I look for it. It’s not super noticeable; otherwise, I think you have to know it’s there.

Removing RV Cabinet Doors and Hardware
This part was not difficult, but it was time-consuming. It’s also where you will want a really good cordless drill. I would also figure out a way to stay highly organized since you will have LOTS of screws, door handles, and other hardware.
As I took the doors off, I put the associated hardware in a plastic baggy and tape it to each door. If it was a set of cabinet doors, I’d put them all in the same bag and keep them together. It worked reasonably well, although I did have some mix-ups. Luckily, they were all the same, so it really didn’t matter too much if they ended up interchanged.
I also had the space to remove my cabinets from the RV to prep them. In my research, I saw someone who didn’t have extra space would remove them, prime and paint where the hardware goes, then rehang them to finish them. I honestly don’t know if this would have worked better or not. The reason I didn’t was that I was afraid of dripping paint, but you have to work with what you’ve got! It was a bit chaotic trying to prime, dry, paint, dry, paint again, dry, flip, paint…you get the picture.

Removing RV Light Fixtures
Another thing I read about RV renovation, was once you paint the walls white, you will really notice the color difference of the ceiling, and you’ll likely want to paint it as well. With that in mind, I unscrewed all the lights from the ceiling.
What I discovered was they were all hardwired in and not connected with a wire splice or twist. If I was replacing the lights completely, I would have just removed them. However, since I was not replacing them, I just let them hang and figured I could just paint around them.
Ultimately I washed the ceiling and primed it but discovered it did not need painting since it was really close to the Swiss Coffee color I painted the walls.

Removing RV Flooring
I had a mix of carpet and linoleum in my RV. And lucky for me, I had carpet on top of linoleum in some places (this is where I’d use a sarcasm font if there was one).
The common complaint I saw in my research was the number of staples that needed to be pulled from the flooring after the carpet was pulled up. Some were also concerned about glue from the vinyl. I ended up with both.
I started trying to pull staples with a pair of pliers which mostly only made my hand hurt and would have taken FOREVER. Then I tried a staple puller I’d bought on Amazon that came with another tool I bought last year. I was so excited about it. It didn’t take long for it to begin to bend. Some of the staples were buried so deep!
RV Renovation Staple Pulling Solution
Ultimately, I bought a staple puller like this, and it made the job much easier. I’d also recommend keeping the pliers around, as sometimes you’ll need it to pull the staple the rest of the way since you can’t always leverage them out with the puller. It took some trial and error.
The last thing I had to contend with was the pieces of linoleum that had been blued down. Luckily, it wasn’t solidly glued down. Much came up with no issue. But, there were lots of corners and areas around vents that were glued.
After much trial and error, I finally found the magic trick.
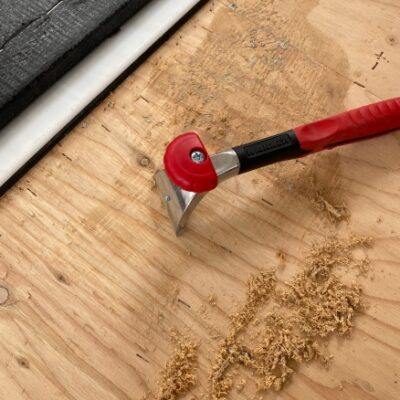
RV Renovation Linoleum Glue Solution
That doesn’t mean it was easy, but it worked much better than anything else I tried. I would highly suggest getting a Warner Carbide Soft Grip Scraper. My subfloor is made of really nice plywood, so I intend to stain and seal it rather than adding new flooring. While it took some muscle, I was finally able to get all the glue off. However, if you were going to put new flooring over it, this probably wouldn’t be such an issue. I will update this when I am done to reflect on how it turned out.


Up Next
Check out my RV painting post for more of my experience and tips for painting an RV interior.
As you search the internet for information on various aspects of RV renovation, it can be very overwhelming and intimidating. The project took me hours upon hours and days upon days. Of course, it was mostly just me doing it. Having a second hand, or two, or three would definitely make for faster work.
There are so many details and lessons learned in RV renovation. But ultimately, as all the RV reno “pros” will tell you, it is so worth it. It is fun to see it finally start to come together, and if you are planning on living in it full-time, it makes it so much more homey and comfortable. After all, you want to love the space you are in.
Also check out the things you need to buy for your RV to get started RVing!
Leave a Reply